
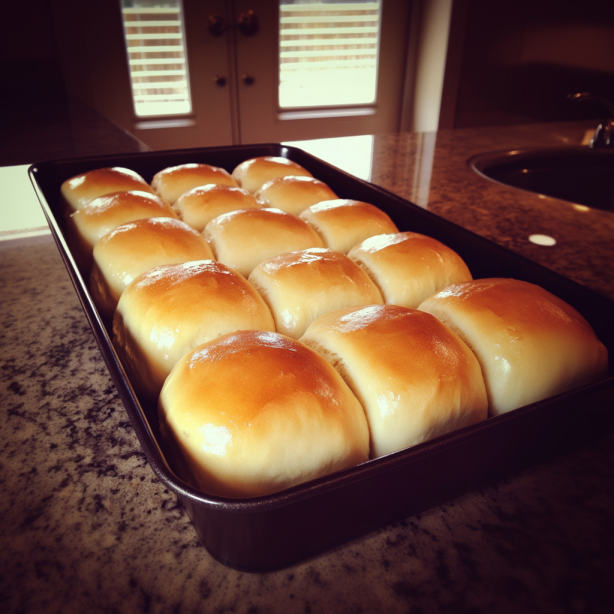
Homemade Amish Dinner Rolls
Imagine pulling out steaming, golden homemade bread from the oven. It’s the kind of Amish Dinner Rolls that make family gatherings unforgettable. These traditional recipes are more than just a side dish. They’re a warm embrace of culinary heritage passed down through generations.
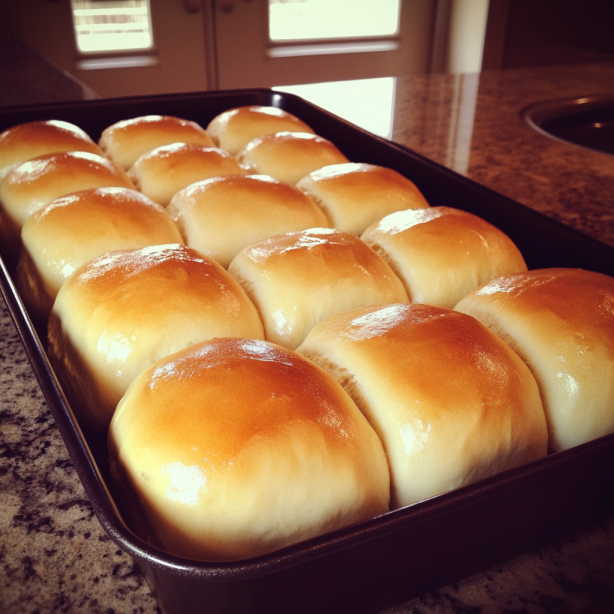
Making homemade bread that melts in your mouth takes patience, skill, and respect for old techniques. Amish Dinner Rolls bring comfort to any table. They turn simple ingredients into something magical.
These rolls connect us to wholesome, delicious cooking, from farmhouse kitchens to modern dining rooms. They are soft, buttery, and irresistibly tender. They promise to make every meal special with their rustic charm and incredible flavor.
What Makes Amish Dinner Rolls Unique?
Amish cuisine is all about simplicity, skill, and old baking ways. Making soft rolls in Amish homes is more than just cooking. It shows their community and heritage.
The History Behind Amish Baking
Amish baking started with European settlers in America. They kept their yeast dough methods the same for generations.
- Baking was traditionally done in wood-fired ovens
- Recipes were memorized, not written down
- Ingredients were locally sourced and fresh
Key Ingredients That Create Flavor
Amish soft rolls have special ingredients that set them apart. The quality of flour, fresh yeast, and careful mixing make them taste amazing.
- High-protein wheat flour
- Active dry yeast
- Farm-fresh eggs
- Whole milk or buttermilk
The Role of Butter in Softness
Butter is key in Amish dinner rolls. Rich, creamy butter adds flavor and makes them soft. The way butter is mixed in makes each roll tender and delicious.
In Amish kitchens, butter isn’t just an ingredient—it’s a cherished tradition passed down through generations.
Step-by-Step Guide to Making Amish Dinner Rolls
Making buttery rolls is all about precision and passion. This guide will show you how to make delicious Amish dinner rolls. We’ll use traditional baking techniques that have been passed down for generations.
Essential Tools for Success
Before starting, make sure you have these important baking tools:
- Large mixing bowl
- Measuring cups and spoons
- Wooden spoon or stand mixer
- Baking sheet
- Pastry brush
- Kitchen towel
Must-Have Ingredients
Quality ingredients are key for authentic Amish dinner rolls. Here’s what you’ll need:
- All-purpose flour
- Active dry yeast
- Warm milk
- Unsalted butter
- Sugar
- Salt
Simple Baking Instructions
Follow these steps to make perfect buttery rolls:
- Activate the yeast in warm milk with a pinch of sugar
- Mix dry ingredients in a large bowl
- Combine wet and dry ingredients to form soft dough
- Knead until smooth and elastic
- Let dough rise in a warm place for 1 hour
- Shape into rolls and allow second rise
- Bake at 375°F until golden brown
Pro tip: Brush rolls with melted butter immediately after baking for an extra-rich flavor that honors traditional heritage cooking methods.
Recipe card
Experience the warm, comforting taste of these homemade Amish dinner rolls—soft on the inside, perfectly buttery on the outside, and ideal for any meal!
Equipment
- Large Mixing Bowl: For combining the dough ingredients.
- Stand Mixer with Dough Hook (or Hand Mixer): To knead the dough effortlessly.
- Measuring Cups & Spoons: For precise ingredient measurements.
- Dough Scraper or Spatula: To help shape and transfer the dough.
- Baking Sheet: For arranging the rolls.
- Parchment Paper or Silicone Baking Mat: To prevent sticking during baking.
- Kitchen Towel or Plastic Wrap: For covering the dough during rising.
- Oven: Preheated to the proper temperature for baking.
Ingredients
- Warm Milk: 1 cup (110°F to 115°F)
- Active Dry Yeast: 2 1/4 teaspoons (1 packet)
- Granulated Sugar: 1/4 cup
- Eggs: 2 large, at room temperature
- Unsalted Butter: 1/2 cup, melted (plus extra for brushing)
- All-Purpose Flour: 4 cups (plus extra for dusting)
- Salt: 1 teaspoon
Instructions
-
Activate the Yeast:
- In a small bowl, mix the warm milk with the sugar and yeast. Allow it to sit for 5–10 minutes until it becomes frothy.
-
Mix & Knead the Dough:
- In a large mixing bowl (or stand mixer bowl), combine the eggs, melted butter, salt, and the activated yeast mixture.
- Gradually add the flour and knead the dough on medium speed for about 5–7 minutes until it becomes smooth and elastic. The dough should be soft and slightly sticky.
-
First Rise:
- Transfer the dough to a lightly greased bowl, cover it with a damp kitchen towel or plastic wrap, and let it rise in a warm spot for about 1 to 1.5 hours until it has doubled in size.
-
Shape the Rolls:
- Gently punch down the risen dough and turn it out onto a lightly floured surface.
- Divide the dough into 12 equal pieces. Shape each piece into a smooth ball and arrange them on a baking sheet lined with parchment paper or a silicone mat, ensuring they are slightly touching.
-
Second Rise:
- Cover the shaped rolls lightly with a towel and let them rise for an additional 30–45 minutes until they become puffy.
-
Bake:
- Preheat your oven to 350°F (175°C).
- Bake the rolls for 15–20 minutes or until they are golden brown on top.
-
Finish & Serve:
- Remove the rolls from the oven and immediately brush them with extra melted butter for a rich, buttery finish.
- Allow the rolls to cool slightly before serving warm.
Tips for Perfecting Your Amish Dinner Rolls
Mastering Amish dinner rolls takes patience and practice. These homemade breads add warmth to family gatherings. Bakers face challenges, but with the right tips, you’ll make perfect rolls every time.
Common Mistakes to Avoid
Temperature is key in bread making. Yeast doesn’t like extreme heat or cold. Make sure your ingredients are at room temperature.
Don’t overmix or undermix the dough. Knead it gently but thoroughly. It should be smooth and elastic, springing back when touched.
Best Storage Practices
Keep your homemade bread fresh by storing rolls in an airtight container at room temperature for up to three days. For longer storage, wrap them in plastic wrap and freeze. When you’re ready to serve, thaw at room temperature and warm them in the oven. This will bring back that soft, buttery texture.
Serving Suggestions for Maximum Enjoyment
These dinner rolls are perfect for family gatherings. Serve them warm with whipped butter, alongside roasted meats, or as mini sandwich bases. For a rustic look, brush with melted garlic butter or sprinkle with fresh herbs before serving. Your guests will love the effort you put into every bite.